



Photoshop Remove Tool: Erase Objects With AI

An object left in the background, a person passing behind the subject, a visible cable, or any distracting detail can reduce the impact of a photograph.
In the past, removing these elements cleanly often required several steps: creating a selection, using Content-Aware Fill, duplicating areas with the Clone Stamp tool, and then manually correcting the transitions.
Photoshop’s Remove tool greatly simplifies this process. Using artificial intelligence, it analyzes the area surrounding an object and automatically reconstructs the space so that it blends with the rest of the image.
This automation saves time, but professional results still depend on the quality of the selection, the complexity of the background, and the judgment of the person performing the retouching.
What Is Photoshop’s Remove Tool?
The Remove tool allows you to erase an unwanted element by simply brushing over it or drawing a loop around the area you want to remove.
Photoshop then analyzes the surrounding pixels and replaces the selected element with content that matches the background.
Depending on the image, the tool can be used to remove:
- a person in the background;
- a cable or pole;
- a spot or imperfection;
- an advertising object;
- a distracting element in a landscape;
- an unnecessary accessory in a product photograph;
- a detail that disrupts the composition.
Unlike a standard eraser, the tool does not leave a transparent area. Instead, it attempts to reconstruct the content that may have existed behind the removed object.
Where Can You Find the Remove Tool?
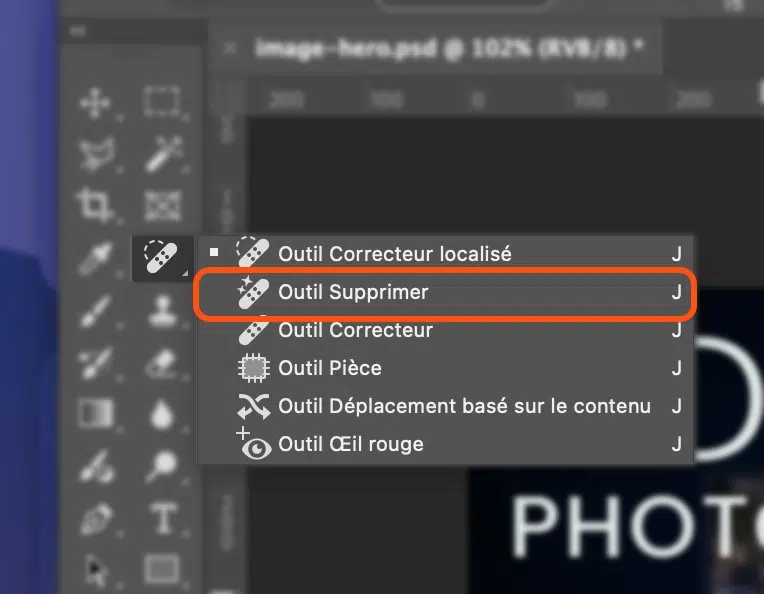
The Remove tool is located in Photoshop’s toolbar alongside the retouching tools.
If it is not immediately visible, click and hold the Spot Healing Brush tool to display the other tools in the same group, then select the Remove tool.
Before getting started, adjust the brush size in the options bar. The brush should be slightly larger than the object you want to remove so that you can cover the entire area in a single pass whenever possible.
How Do You Remove an Object With AI in Photoshop?
The process is quick, but following a few steps can help you achieve a cleaner result.
1. Open and Prepare the Image
Open the photograph you want to retouch in Photoshop.
To maintain a non-destructive workflow, create a new empty layer above the original image. This allows you to perform the removal without directly altering the pixels on the original layer.
This precaution makes corrections easier and allows you to compare the edited result with the original photograph.
2. Select the Remove Tool
Choose the Remove tool from the toolbar.
In the options bar, set the brush to a size slightly larger than the element you want to erase. A brush that is too small may force Photoshop to process the object in several sections, potentially creating less natural transitions.
3. Choose the Processing Mode
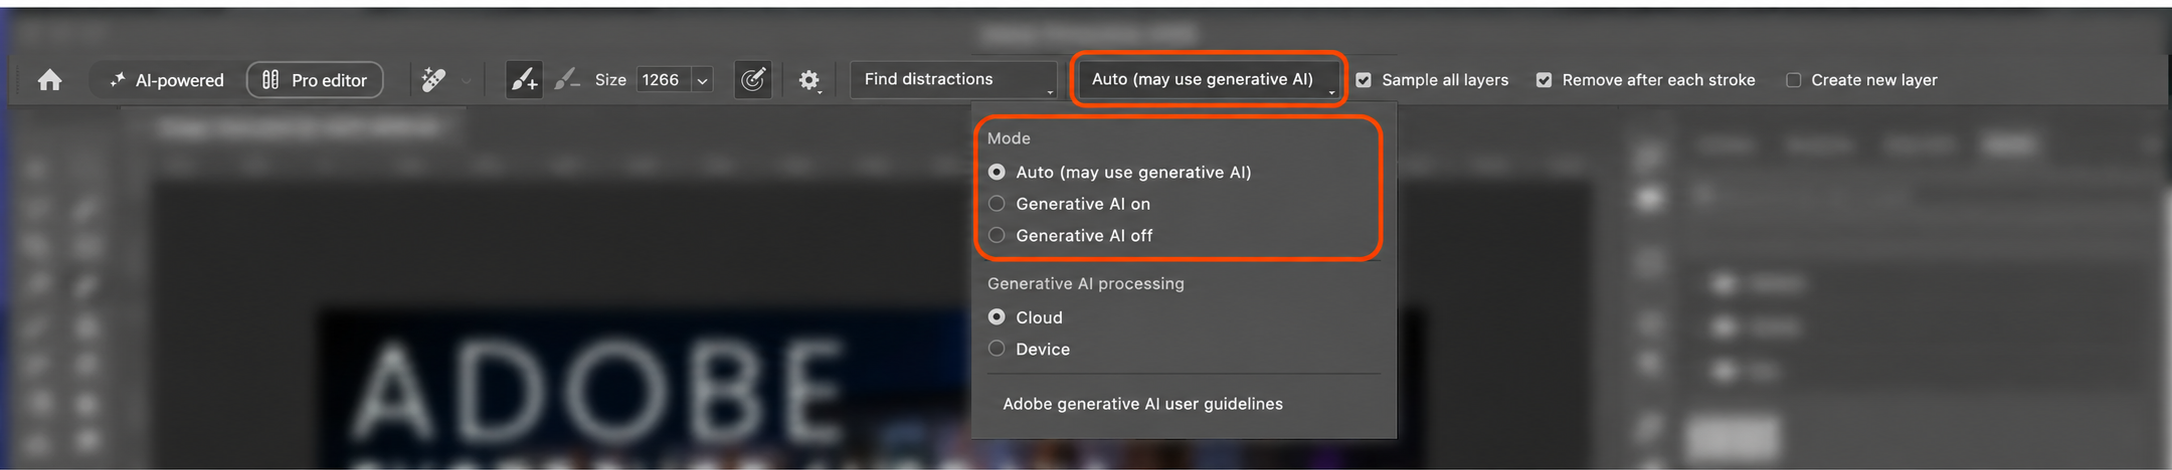
Photoshop offers different modes that determine how the tool reconstructs the selected area:
- Generative AI on: Photoshop uses generative artificial intelligence to interpret the image and replace the selected area;
- Generative AI off: the tool relies on traditional retouching technologies;
- Auto: Photoshop selects the method it considers most appropriate and may use generative AI.
Auto mode is a good starting point. If the result lacks consistency, compare it with the AI-on and AI-off modes. A traditional method may sometimes be more effective for a small imperfection, while generative AI may be better at reconstructing a complex background.
4. Enable Sample All Layers
If you are working on an empty layer, enable Sample All Layers.
Photoshop can then analyze the visible information from the layers below while placing the correction on the selected layer.
This method keeps the original image intact and allows you to hide, adjust, or remove the edit later.
5. Brush Over or Outline the Object
Brush over the object until it is completely covered.
You can also use the brush like a lasso and draw a loop around the element. Photoshop automatically closes the shape when the endpoints are close enough, then processes the entire area inside the loop.
This second method is particularly useful for large or irregularly shaped objects.
6. Examine the Result Carefully
A successful removal should look natural, even when the image is enlarged.
Pay particular attention to:
- the continuity of lines;
- perspective;
- shadows;
- reflections;
- repeated textures;
- colour transitions;
- details near the edges;
- the consistency of grain and sharpness.
If the result is not convincing, undo the operation and try again using a slightly different area or another processing mode.
Process Complex Objects in Multiple Passes
The Remove after each stroke option automatically applies the correction as soon as you release the mouse button.
This method works well for small elements that can be covered in a single pass.
For a larger or more complex object, turn this option off. You can then make several strokes before asking Photoshop to process the entire area.
This approach is useful when the object includes multiple parts, such as:
- a person and their shadow;
- a vehicle and its reflection;
- a cable crossing several textures;
- a piece of furniture placed in front of a detailed background;
- an element touching the edge of the image.
Everything that might reveal the original object’s presence must be removed. Erasing a person without removing their shadow, for example, will produce an incomplete result.
Why Do Some Removals Work Better Than Others?
The quality of the result depends largely on the visual context.
The Remove tool generally works very well when an object appears in front of:
- a sky;
- a relatively uniform wall;
- a natural surface;
- sand;
- grass;
- a slightly blurred background;
- a consistent texture.
The operation may become more difficult when the element overlaps:
- architectural lines;
- geometric patterns;
- a face or part of a body;
- complex reflections;
- strong shadows;
- several overlapping objects;
- a precise perspective.
In these situations, AI may introduce distortions, repeat certain textures, or invent details that do not appear credible.
How Can You Achieve a More Natural Removal?
A few best practices can significantly improve the result.
Include a Small Margin Around the Object
Do not cover only the pixels inside the element. Include a small area around its edges so that Photoshop can also remove associated outlines, colour spill, shadows, or reflections.
Remove the Object and Its Shadow Separately
A complex shadow may require a second pass. Processing the two areas separately can sometimes provide Photoshop with more context for reconstructing the background.
Work From Larger Areas to Smaller Details
Begin by removing the main element, then correct the remaining imperfections. This method prevents unnecessary edits before the overall structure has been reconstructed.
Test Several Methods
Generative AI is not always the best option. Compare Auto mode, AI mode, and non-AI mode before choosing the most convincing result.
Combine Retouching Tools
The Remove tool can complete most of the work and then be supplemented with:
- the Spot Healing Brush tool;
- the Healing Brush tool;
- the Clone Stamp tool;
- layer masks;
- Content-Aware Fill;
- Generative Fill.
The right tool depends on the type of imperfection that needs to be corrected.
Remove Tool or Generative Fill: Which Should You Choose?
Both features can remove an object, but they do not always address the same need.
The Remove tool is particularly effective for quickly cleaning up an image. It is suitable for unwanted elements that you simply want to eliminate while preserving the existing background.
Generative Fill provides more creative possibilities. It can remove an element, but it can also replace it with new content based on a written prompt.
As a general rule, use:
- the Remove tool to clean up a photograph or eliminate a distraction;
- Generative Fill to transform a scene or replace an object with another element;
- traditional retouching tools to correct small imperfections and refine the final details.
A professional workflow often combines several of these methods.
AI Does Not Replace Retouching Skills
The Remove tool makes certain operations much faster, but it does not automatically guarantee a perfect result.
Photoshop must interpret what might exist behind the object. This interpretation can be incorrect, particularly when the background contains complex structures or important visual information.
The person performing the retouching must therefore know how to:
- choose the area to process;
- select the appropriate mode;
- work on the correct layers;
- recognize generated defects;
- correct transitions;
- maintain visual consistency;
- evaluate the result according to its intended use.
AI performs part of the technical work. The professional remains responsible for realism, composition, and final quality.
Why Learn to Use AI Tools in Photoshop?
Testing the Remove tool makes it possible to understand its basic operation quickly. However, structured training helps users determine when to apply it, how to prepare an image, and which other tools to combine it with.
Doussou Formation’s Artificial Intelligence in Photoshop course covers selections, masks, non-destructive retouching methods, and the main AI features integrated into the software.
Through demonstrations and practical workshops, participants learn how to:
- create and refine selections;
- save and reuse selections;
- work with layer masks;
- remove objects using traditional tools and AI;
- use Generative Fill;
- replace a background;
- extend an image beyond its original frame;
- integrate these features into a professional production workflow.
This one-day course is designed for graphic designers, photographers, and regular Photoshop users who already have a basic understanding of the software. It is available through live virtual classroom training and in person in Montreal and Quebec City.
Clean Up Your Images Faster With AI

The Remove tool transforms what was once a complex operation into a much faster process. With only a few strokes, it can remove an object and automatically reconstruct the background.
However, speed should not replace attention to detail. A successful removal depends on proper preparation, an appropriate selection, and a careful review of the result.
When artificial intelligence features are combined with Photoshop’s traditional tools, they can accelerate the retouching process while maintaining the control required for professional production.